 Cloud Frame
Digital photo frame related FAQ
To fix this problem, you'll need to install some system upgrade to your PF709 unit. Please follow following steps.
- 1. Download the upgrade package to your PC.
- 2. Upzip the downloaded package, and you should be able to see a file named "AMAMUPUP.BIN"
- 3. Prepare an empty SD card with 1GB or more storage space, and copy the unzipped file "AMAMUPUP.BIN" to the SD card
- 4. Go back to the PF709 unit, unplug it to completely power off, insert the SD card to your unit.
- 5. Now plug in the power cord to power on the PF709 unit.
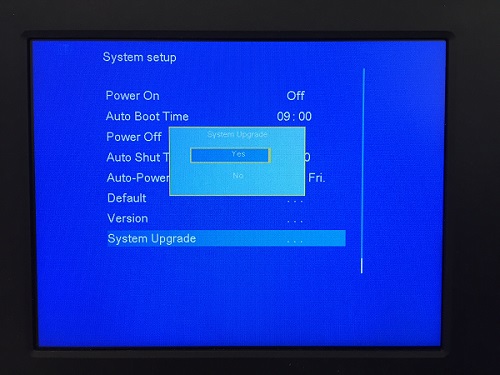
- 6. After power on, navigate to Setting, then choose "System setup"
- 7. In System setup, navigate to the bottom option "System Upgrade", and click "OK" button, a window will pop up, choose "Yes".
- 8. Your PF709 unit screen will become black with a green progress bar moving forward, which indicates the upgarde patch is been installed.
- 9. After around 5 seconds, the system will automatically reboot, and upgrades has been installed to your unit.
- 10. Now you can keep a SD card or USB drive inserted, every time the PF709 unit auto shutdown and turn on, it'll play your photos from the SD card or USB drive, instead of system photos.
Depending on the type of frame you select. Each frame has its own default set number of memory pre-installed into the unit and depending on the size of the memory will depend on how many pictures you can have on your digital picture frame. Here is a rough estimate on what a certain size memory can hold. Remember you can always increase memory to majority of our digital frames. Simply buy a SD card that will work for your digital frame and insert it into the expanstion slot and you will have increased space into your digital frame.
Since surrounding factor, the images loaded in CD705 may rotate arbitrarily without your operation, the probability to have this problem is about 3%. The proposed solution is as follows.
There are a left button and a right button on the back of CD705, those are picture rotation buttons. To press the right button once will rotate pictures clockwise 90 degrees, to press the left button once will rotate pictures counter-clockwise 90 degrees. You can manually adjust the images directions.
It has very minor probability that the images will go in wrong direction again after you adjusted as above. In case it happens on your device, please follow the next instruction to upgrade your CD705.
If your CD705 Digital Photo Frame has picture automatically rotating problem, please update your software to solve it.
1. Click HERE to download the CD705 upgrade package to your PC desktop.
2. After the software is fully downloaded, go to your PC desktop, unzip or extract the package, and you'll see one new file on your PC desktop (UPG956C.AP).
3. Prepare an EMPTY SD card, connect to your PC.
4. Copy the file (UPG956C.AP) to your SD card.
5. Take out the SD card from your PC.
6. Turn off your CD705, and insert the SD card at the right side slot.
7. Turn on your CD705 device, you'll see the screen in half black and half white, which means the upgrading is processing.
8. Wait for around 20 seconds, you'll see "Reboot System" on the screen, please remove the SD card immediately
9. After the reboot, your system is updated, then turn off the CD705.
10. Turn on your CD705, now, it goes to normal.